Are you tired of struggling with a vacuum cleaner that has a broken cord? It can be frustrating to have a perfectly functioning vacuum that can’t be used because of a damaged power cord. But before you toss it out and buy a new one, you may be wondering if it’s possible to replace the cord yourself.
The good news is that replacing a cord on a vacuum cleaner is doable, even for those without much experience in electrical repairs. With a few tools and some patience, you can have your vacuum up and running again in no time. In this article, we’ll explore the steps involved in replacing a cord on a vacuum cleaner and provide some tips to make the process easier.
Replacing a Cord on a Vacuum Cleaner: What You Need to Know
1. Understanding the Basic Components of a Vacuum Cleaner Cord
Most vacuum cleaners have a cord that powers the motor and allows you to move the machine around. The cord consists of two main parts: the plug and the wire. The plug connects the vacuum cleaner to the power outlet, while the wire carries the electricity from the outlet to the motor.
When the cord becomes damaged or starts to malfunction, you may need to replace it. Fortunately, replacing a cord on a vacuum cleaner is a relatively simple process that you can do yourself with the right tools and knowledge.
To replace the cord, you will need to remove the old cord from the vacuum cleaner and replace it with a new one. You will also need to make sure that the new cord is the right length and gauge for your vacuum cleaner model.
2. Tools and Materials You Will Need
Before you begin replacing the cord on your vacuum cleaner, you will need to gather some tools and materials. Here is a list of what you will need:
– Replacement cord
– Screwdriver
– Wire cutters
– Wire strippers
– Electrical tape
– Soldering iron and solder (optional)
Make sure that you have all of the necessary tools and materials before you begin the process.
3. Steps to Replace a Cord on a Vacuum Cleaner
Here are the steps to replace a cord on a vacuum cleaner:
1. Unplug the vacuum cleaner from the power outlet.
2. Remove the screws that hold the cover in place and remove the cover.
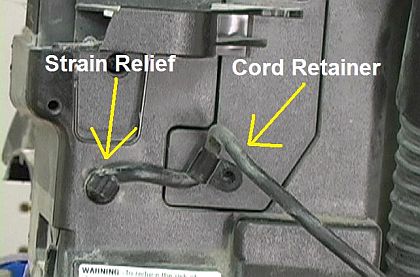
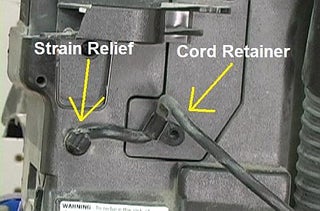
3. Locate the cord inside the vacuum cleaner and identify where it is connected to the motor.
4. Disconnect the old cord from the motor.
5. Cut the new cord to the appropriate length and strip the ends of the wires.
6. Connect the new cord to the motor using either the screws or the soldering iron.
7. Replace the cover and screw it back in place.
8. Test the vacuum cleaner to make sure that it is working properly.
4. Benefits of Replacing a Cord on a Vacuum Cleaner
Replacing a cord on a vacuum cleaner can provide several benefits. For one, it can save you money by avoiding the need to purchase a new vacuum cleaner. It can also ensure that your machine is working at its best, with full power and suction.
Additionally, replacing a cord on a vacuum cleaner can be a fun and rewarding DIY project. By doing the work yourself, you can feel a sense of accomplishment and pride in your ability to fix things around the house.
5. Cord Replacement vs. Buying a New Vacuum Cleaner
When your vacuum cleaner cord starts to malfunction, you may wonder whether it is better to replace the cord or buy a new machine altogether. In most cases, replacing the cord is the more cost-effective option.
Buying a new vacuum cleaner can be expensive, especially if you want a high-quality model with advanced features. By contrast, replacing the cord is a relatively inexpensive repair that can extend the life of your existing machine.
6. Frequently Asked Questions about Replacing a Vacuum Cleaner Cord
Q: Can I replace the cord on any vacuum cleaner?
A: In most cases, yes. However, it is important to make sure that you purchase a replacement cord that is the right length and gauge for your specific vacuum cleaner model.
Q: Do I need to have any special skills to replace a vacuum cleaner cord?
A: No, but you will need to have some basic DIY skills and tools. If you are not comfortable working with electrical components, it may be best to leave the repair to a professional.
Q: How long does it take to replace a vacuum cleaner cord?
A: The process can take anywhere from 30 minutes to an hour, depending on your skill level and the complexity of your vacuum cleaner model.
7. Tips for Maintaining Your Vacuum Cleaner Cord
To extend the life of your vacuum cleaner cord, it is important to take good care of it. Here are some tips for maintaining your cord:
– Avoid twisting or kinking the cord, as this can cause damage to the wires inside.
– Never pull the cord out of the outlet by yanking on the cord itself. Instead, grasp the plug firmly and pull it out gently.
– Keep the cord away from sharp edges or abrasive surfaces that could cause cuts or abrasions.
– Store the vacuum cleaner cord neatly and out of the way when not in use.
8. Conclusion
Replacing a cord on a vacuum cleaner is a simple and cost-effective DIY repair that can save you money and extend the life of your machine. With the right tools and materials, you can replace the cord yourself in just a few easy steps.
By taking good care of your vacuum cleaner cord and following these tips, you can ensure that your machine is working at its best and that you get the most out of your investment.
9. References
– “How to Replace a Vacuum Cleaner Cord” by The Spruce
– “How to Replace a Frayed Power Cord on Your Vacuum Cleaner” by eReplacementParts.com
– “How to Replace a Vacuum Cleaner Power Cord” by DoItYourself.com
10. Related Articles
– “10 Tips for Cleaning Your Vacuum Cleaner” by [Your Name]
– “How to Clean a Vacuum Cleaner Filter” by [Your Name]
– “Vacuum Cleaner Maintenance: Tips and Tricks” by [Your Name]
Frequently Asked Questions
Can You Replace a Cord on a Vacuum Cleaner?
Yes, you can replace a cord on a vacuum cleaner. However, it can be tricky and requires some basic electrical knowledge. First, you need to unplug the vacuum and remove any screws that hold the casing together. Then, carefully remove the damaged cord and note how it was attached to the vacuum. Next, attach the new cord in the same way as the old cord and reattach the casing. Finally, test the vacuum to make sure it is working properly.
It is important to note that if you are not comfortable working with electrical components, it is best to take your vacuum to a professional for repair. Additionally, make sure to use the correct replacement cord for your specific vacuum model to ensure safety and proper function.
What Tools Do You Need to Replace a Cord on a Vacuum Cleaner?
To replace a cord on a vacuum cleaner, you will need a few basic tools such as a screwdriver, wire strippers, wire cutters, electrical tape, and a replacement cord. The specific tools needed may vary depending on the vacuum model and the complexity of the repair.
Before starting the repair, make sure to have all the necessary tools and double-check that the replacement cord is compatible with your vacuum. It is also important to follow any specific instructions provided by the manufacturer or a professional repair service.
Can You Repair a Frayed Vacuum Cleaner Cord?
A frayed vacuum cleaner cord can be repaired, but it is not recommended. Frayed cords are a safety hazard and can lead to electrical shock or even a fire. If you notice a frayed cord, it is best to replace it with a new one.
Replacing the cord on a vacuum cleaner is a relatively simple and inexpensive repair that can save you from potential harm. It is important to always prioritize safety when dealing with electrical components and to seek professional help if needed.
How Often Should You Replace a Vacuum Cleaner Cord?
There is no specific timeline for when you should replace a vacuum cleaner cord. The lifespan of a cord can vary depending on usage and maintenance. However, it is important to regularly check the cord for any damage such as fraying or cracking.
If you notice any damage, replace the cord immediately to avoid any safety hazards. Additionally, if your vacuum is not functioning properly, it may be a sign that the cord needs to be replaced. It is always better to err on the side of caution and replace the cord if there is any doubt.
Is it Worth Repairing a Vacuum Cleaner Cord?
Whether it is worth repairing a vacuum cleaner cord depends on the specific situation. If the vacuum is relatively new and in good condition, it may be worth repairing the cord. However, if the vacuum is older and has multiple issues, it may be more cost-effective to replace the entire vacuum.
Additionally, if you are not comfortable repairing the cord yourself, it may be more cost-effective to take the vacuum to a professional repair service. Ultimately, the decision to repair or replace a vacuum cleaner cord depends on the individual circumstances and should be made with safety and cost in mind.
Replace a Damaged Power Cord on a Vacuum or Appliance – Bissell, Eureka, Hoover
In conclusion, the answer to whether you can replace a cord on a vacuum cleaner is a resounding yes! With the right tools and a bit of know-how, you can easily replace a damaged or broken cord on your vacuum cleaner.
Replacing the cord on a vacuum cleaner is a simple and cost-effective solution that can save you money and extend the life of your appliance. It is also a great way to ensure that your vacuum cleaner is safe to use and prevent any potential hazards.
So, if you’re experiencing issues with your vacuum cleaner’s cord, don’t hesitate to replace it yourself. With a little bit of patience and some basic tools, you can get your vacuum cleaner back up and running in no time, and enjoy a cleaner, healthier home.