
Are you ready to get your hands dirty while preparing your Thanksgiving dinner? Cleaning a turkey fan is an important part of the process and it can be a bit tricky if you haven’t done it before. In this article, you will learn how to clean a turkey fan properly and efficiently so that you can enjoy the perfect turkey for your holiday feast. Let’s take a look at the steps you need to take to get the job done right.
How to Clean a Turkey Fan:
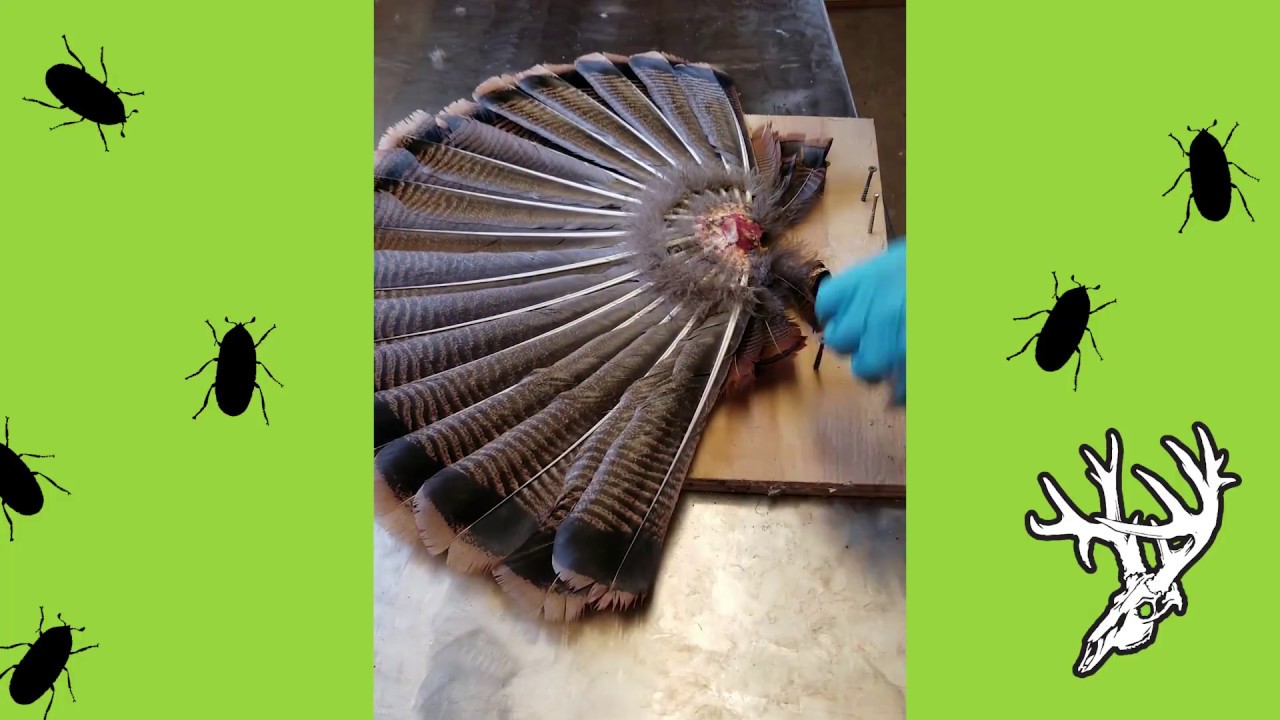
- Put on rubber gloves to protect your hands.
- Soak the fan in a bucket of warm, soapy water.
- Gently scrub the fan with a soft-bristled brush.
- Rinse the fan in a bucket of clean, warm water.
- Dry the fan with a soft cloth or paper towel.
- Spray the fan with a disinfectant spray.
- Wipe off any excess spray with a soft cloth or paper towel.
How to Clean a Turkey Fan
Cleaning the fan of a turkey is a process that should be done carefully, as the fan is delicate and can easily be damaged. A turkey’s fan is an extremely important part of the bird and should not be neglected when it comes to cleaning. This article will provide step-by-step instructions for how to properly clean a turkey fan.
Step 1: Prepare the Fan
The first step in cleaning a turkey fan is to remove any debris or dirt that may be present. This can be done using a soft brush or damp cloth. Be sure to brush away any dirt or debris that may be stuck in the feathers. Once the fan is free of any dirt or debris, it can be prepared for cleaning.
Step 2: Soak the Fan
Once the fan is free of dirt and debris, it is time to soak it in a bowl of warm, soapy water. Allow the fan to soak for at least 10 minutes. During this time, the feathers will absorb the soap and water, allowing them to be more easily cleaned. It is important to use a mild soap, as harsh soaps can damage the feathers.
Step 3: Gently Scrub the Fan
Once the fan has been soaking for at least 10 minutes, it is time to gently scrub the fan. Using a soft brush or cloth, gently scrub the fan to remove any dirt or debris that may have been missed during the initial cleaning. Be sure to be gentle, as the fan is delicate and can easily be damaged. Once the fan has been scrubbed, it should be rinsed thoroughly with clean water.
Step 4: Dry the Fan
Once the fan has been rinsed, it is time to dry it. Place the fan on a clean towel and allow it to air dry. Do not use a hairdryer or any other type of heat to dry the fan, as this could damage the feathers. Once the fan is completely dry, it is time to move on to the next step.
Step 5: Condition the Fan
Once the fan is dry, it is time to condition it. There are a variety of conditioners available for this purpose, but it is important to use one specifically designed for poultry. Apply a small amount of conditioner to the fan and gently massage it into the feathers. Allow the conditioner to sit on the fan for several minutes before rinsing it off with clean water.
Step 6: Re-Shape the Fan
Once the fan has been conditioned, it is time to re-shape it. Using your hands, gently shape the fan back into its original form. This step is especially important if the fan was damaged during the cleaning process. Make sure to pay special attention to any areas that may have been damaged so that they can be properly re-shaped.
Step 7: Store the Fan
Once the fan has been properly cleaned and conditioned, it is important to store it properly. Store the fan in a cool, dry place away from direct sunlight. This will help to ensure that the fan stays in good condition and does not become damaged over time.
Tips for Cleaning a Turkey Fan
- Always use a mild soap when cleaning the fan.
- Be sure to rinse the fan thoroughly after each step.
- Let the fan air dry completely before storing it.
- Always use a conditioner specifically designed for poultry.
- Store the fan in a cool, dry place away from direct sunlight.
Safety Precautions
It is important to take safety precautions when cleaning a turkey fan. Always wear gloves to protect your hands from any sharp edges on the fan. Additionally, always keep the fan away from any open flames or heat sources, as this could cause the feathers to catch fire.
Additional Tips
It is important to take your time when cleaning a turkey fan. If done properly, the fan can last for many years. Additionally, it is important to inspect the fan regularly for any signs of damage or wear. If any damage is found, it is important to address the issue immediately to prevent further damage.
Frequently Asked Questions
How do I clean a turkey fan?
The first step in cleaning a turkey fan is to take it outside and give it a thorough shake to remove any dirt or debris clinging to the fan. You can also use a soft brush to remove any stubborn dirt or dust. Once the fan is clean, it is important to inspect the fan for any broken or missing feathers and to ensure the fan is intact. If any feathers are broken, you can use a pair of scissors to trim them off and replace them with new feathers.
Once you have inspected the fan, you can begin the cleaning process. Start by wiping down the fan with a damp cloth to remove any dirt or dust. Be sure to get into all the crevices and feathers. Once the fan is clean, you can use a soft brush to groom the feathers on the fan, ensuring that all the feathers are neat and in place. Once the fan is dry, you can store it in a dry, cool area until you are ready to use it.
What materials do I need to clean a turkey fan?
When cleaning a turkey fan, you will need a few basic materials. First, you will need a soft brush or cloth to brush or wipe off any dirt or dust. You will also need a pair of scissors to trim any broken or missing feathers. Finally, you will need a damp cloth to wipe down the fan and a dry cloth to dry it off. Additionally, you may want to have a container of water nearby in case you need to rinse off any stubborn dirt or dust.
When cleaning the fan, it is important to use gentle, non-abrasive materials and to be careful not to put too much pressure on the fan. You will also want to avoid using any harsh cleaning chemicals or detergents, as these could damage the fan. Taking these simple steps will ensure that your turkey fan remains in good condition and is ready to use when you need it.
How often should I clean a turkey fan?
It is important to clean your turkey fan at least once a year. This will help ensure that the feathers on the fan remain in good condition and are free of dirt and debris. Additionally, it is a good idea to inspect the fan before and after each use to ensure that all the feathers are intact and that the fan is in good condition. If any broken or missing feathers are found, they should be trimmed off and replaced with new feathers.
Cleaning your fan once a year will help maintain its condition and extend its lifespan. It is also important to store the fan in a cool, dry place to protect it from dirt and dust. Taking these simple steps will ensure that your turkey fan remains in good condition and lasts for many years.
What is the best way to store a turkey fan?
The best way to store a turkey fan is in a cool, dry place. This will help protect the fan from dirt and dust and ensure that the feathers remain in good condition. It is also important to keep the fan away from any direct sunlight or high temperatures, as these can cause the feathers to fade or become brittle. Additionally, the fan should be stored in a container or bag to keep it clean and safe.
When storing the fan, it is important to ensure that the fan is completely dry. If the fan is wet or damp, it can cause the feathers to become moldy or mildewed. Additionally, it is important to inspect the fan for any broken or missing feathers before storing it away. Taking these simple steps will help ensure that your turkey fan remains in good condition and is ready to use when you need it.
How do I replace broken feathers on a turkey fan?
If you find any broken or missing feathers on your turkey fan, you can replace them with new feathers. First, you will need to trim off the broken feathers with a pair of scissors. Then, you can purchase a set of replacement feathers from your local craft store. Make sure to choose feathers that match the size and color of the existing feathers on the fan.
Once you have the replacement feathers, you can begin the process of attaching them to the fan. You can use a hot glue gun or needle and thread to attach the feathers. Be sure to place the feathers firmly against the base of the fan and to keep the feathers in place until the glue or thread has dried.
Once the feathers are attached, you can groom them with a soft brush to ensure that all the feathers are neat and in place. Taking these steps will help ensure that your turkey fan remains in good condition and is ready to use when you need it.
Removing, Cleaning, and Mounting a Turkey Fan | Turkey Mounting 101
In conclusion, cleaning a turkey fan can be a messy but rewarding job. While it is a task that requires patience and attention to detail, following the steps above will help make the job a lot easier. Just remember to use the right tools and wear protective clothing to ensure a safe and successful experience. Cleaning a turkey fan can be a great way to show your appreciation for the animal and help keep your home clean.