Are you struggling to keep your plate heat exchanger clean and functioning at its best? Don’t worry, you’re not alone. Plate heat exchangers are vital components in many industrial processes, but they can quickly become clogged with dirt, debris, and scale buildup, affecting their efficiency and lifespan.
In this guide, we’ll show you step-by-step how to clean a plate heat exchanger, including the tools and materials you’ll need, safety precautions to take, and tips for maintaining your unit to prevent future issues. With our helpful tips and tricks, you’ll be able to keep your plate heat exchanger in top shape and operating like new. Let’s get started!
- Disconnect and drain the exchanger
- Remove the plates and soak them in a cleaning solution
- Scrub the plates with a soft brush and rinse with water
- Reassemble the exchanger and test for leaks

How to Clean Plate Heat Exchanger?
Plate heat exchangers are widely used in various industries for heat transfer purposes. However, over time, these exchangers tend to accumulate dirt, debris, and other contaminants that can negatively impact their efficiency. Therefore, it is essential to clean them regularly to maintain optimal performance. In this article, we will explain how to clean plate heat exchangers.
Step 1: Safety Precautions
Before starting the cleaning process, it is crucial to take the necessary safety precautions. Ensure that the equipment is turned off and isolated from the power source. Wear protective gear, such as gloves and goggles, to avoid any contact with chemicals or hot surfaces. Also, check the manufacturer’s guidelines for specific safety instructions.
It is important to note that some cleaning agents can be hazardous to health and the environment. Therefore, use only the recommended cleaning solutions and dispose of them properly.
Step 2: Disassembling the Plate Heat Exchanger
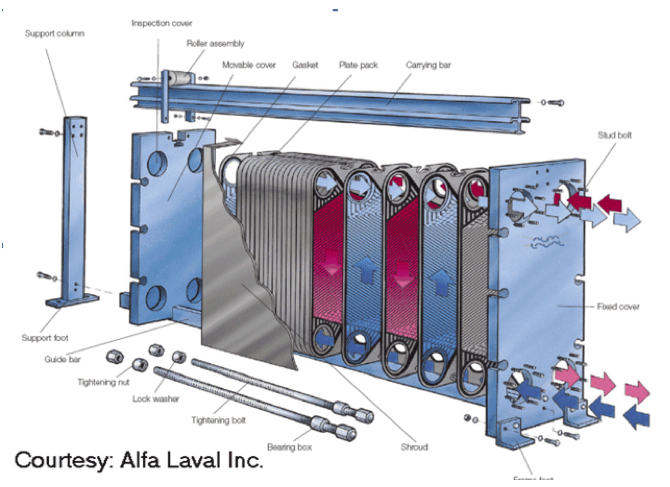
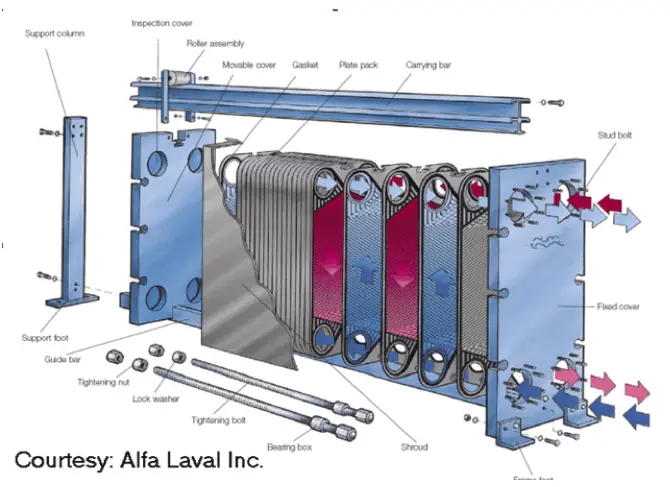
To clean the plate heat exchanger, you need to disassemble it. Start by removing the end plates and the bolts that hold the plates together. Then, carefully separate the plates and remove any gaskets or seals. Place the plates in a safe location to avoid damage.
Step 3: Cleaning the Plates
Once the plates are removed, clean them thoroughly using a cleaning solution recommended by the manufacturer. Apply the solution on both sides of the plates, and use a soft-bristled brush to remove any dirt or debris. Rinse the plates with water and dry them with a clean cloth.
Alternatively, you can use a high-pressure washer to clean the plates. However, be careful not to damage the plates or the gaskets.
Step 4: Cleaning the Gaskets and Seals
After cleaning the plates, inspect the gaskets and seals for any damage or wear. If necessary, replace them with new ones. Clean the gaskets and seals using a mild soap solution and a soft-bristled brush. Rinse them with water and dry them with a clean cloth.
Step 5: Reassembling the Plate Heat Exchanger
Once all the components are cleaned and dried, reassemble the plate heat exchanger. Start by placing the gaskets or seals on the plates and aligning them correctly. Then, fasten the bolts and tighten them according to the manufacturer’s specifications. Finally, install the end plates and secure them with the bolts.
Step 6: Testing the Plate Heat Exchanger
After reassembling the plate heat exchanger, test it to ensure that it is working correctly. Turn on the equipment and monitor the temperature and pressure readings. If everything is working correctly, you have successfully cleaned the plate heat exchanger.
Benefits of Cleaning Plate Heat Exchangers
Regular cleaning of plate heat exchangers can provide several benefits, including:
– Improved efficiency: A clean plate heat exchanger can transfer heat more efficiently, reducing energy consumption and costs.
– Increased lifespan: Regular cleaning can extend the lifespan of the plate heat exchanger and reduce the need for repairs or replacements.
– Improved quality: A clean plate heat exchanger can provide better-quality output, reducing the risk of product contamination or quality issues.
Conclusion: Maintaining Plate Heat Exchanger
Cleaning plate heat exchangers is essential for maintaining optimal performance and extending their lifespan. By following the steps outlined in this article and taking the necessary safety precautions, you can ensure that your plate heat exchanger is clean and working correctly. Regular cleaning can provide several benefits, including improved efficiency, increased lifespan, and improved quality.
Freequently Asked Questions
Plate Heat Exchanger (PHE) is an essential part of many industries. PHE helps in transferring heat between two fluids, which makes it necessary to keep it clean and maintained. Cleaning PHE is not an easy task, but with the right approach, it can be done effectively. Here are some frequently asked questions about cleaning PHE:
1. Why is it necessary to clean PHE?
PHE is used for transferring heat between two fluids. During the process, some particles may stick to the plate surface, which can reduce the efficiency of heat transfer. Moreover, the accumulation of particles can result in corrosion, which can further damage the PHE. Therefore, it is necessary to clean PHE regularly to maintain its efficiency and lifespan.
There are several methods to clean PHE, such as chemical cleaning, mechanical cleaning, and high-pressure water jetting. The selection of the cleaning method depends on the type of fouling and the condition of the PHE.
2. How often should I clean PHE?
The frequency of cleaning PHE depends on the operating conditions and the type of fluid being used. In general, it is recommended to clean PHE at least once a year. However, if the PHE is operating in a harsh environment or with a fluid that is prone to fouling, it may require more frequent cleaning.
The best way to determine the cleaning frequency of PHE is to monitor its performance regularly. If you notice a decrease in heat transfer efficiency or an increase in pressure drop, it may be time to clean the PHE.
3. What are the steps involved in cleaning PHE?
The cleaning procedure for PHE varies depending on the fouling type and condition of the PHE. However, the general steps involved in cleaning PHE are as follows:
– Isolate the PHE from the system
– Remove the end plates
– Inspect the plates for damage or corrosion
– Flush the plates with water to remove loose particles
– Apply the cleaning solution on the plates
– Rinse the plates with water to remove the cleaning solution
– Reassemble the PHE and reconnect it to the system.
4. Can I use any cleaning solution to clean PHE?
No, you cannot use any cleaning solution to clean PHE. The selection of the cleaning solution depends on the type of fouling and the material of the plates. Using the wrong cleaning solution can damage the plates or reduce their lifespan.
It is recommended to consult with the PHE manufacturer or a professional cleaning service to determine the appropriate cleaning solution for your PHE.
5. How can I prevent fouling in PHE?
Preventing fouling in PHE is important to maintain its efficiency and lifespan. Here are some tips to prevent fouling in PHE:
– Use the appropriate fluid for the application
– Install filters to remove particles from the fluid
– Monitor the performance of PHE regularly
– Clean PHE regularly and follow the recommended cleaning procedure
– Use a water treatment system to prevent scaling and corrosion.
How to Clean a Plate Exchanger [Guide] | Plate Heat Exchanger Cleaning
In conclusion, cleaning a plate heat exchanger is a crucial task that should be carried out regularly to ensure optimal performance and longevity. By following the steps outlined in this guide, you can effectively and efficiently clean your plate heat exchanger.
Remember to always wear protective gear and follow safety guidelines when cleaning your plate heat exchanger. Regular maintenance and cleaning will not only prevent costly repairs but also ensure that your system runs smoothly and efficiently.
In summary, cleaning a plate heat exchanger involves disassembling the unit, cleaning the plates, reassembling the unit, and testing for leaks. By following these steps and taking care of your plate heat exchanger, you can extend its lifespan and ensure it continues to operate at peak performance.

