Introduction:
Bed bugs are one of the most annoying pests that can infest your home. They can hide in almost any crack or crevice, and washing your clothes and linens is one of the most effective ways to get rid of them. But what about your washing machine? If you’ve been washing bed bug-infested items in your machine, it’s essential to clean it thoroughly to prevent the bugs from spreading.
Paragraph 1:
Cleaning your washing machine after a bed bug infestation is not only essential to prevent the bugs from spreading, but it’s also important for your health. Bed bugs can carry diseases and bacteria that can be harmful to humans, so it’s crucial to take the necessary steps to get rid of them properly.
Paragraph 2:
In this article, we will discuss the steps you need to take to clean your washing machine after bed bugs. From emptying the machine to using hot water and bleach, we’ll cover everything you need to know to ensure that your washing machine is bed bug-free and ready to use again. So, let’s get started and learn how to clean your washing machine after bed bugs.
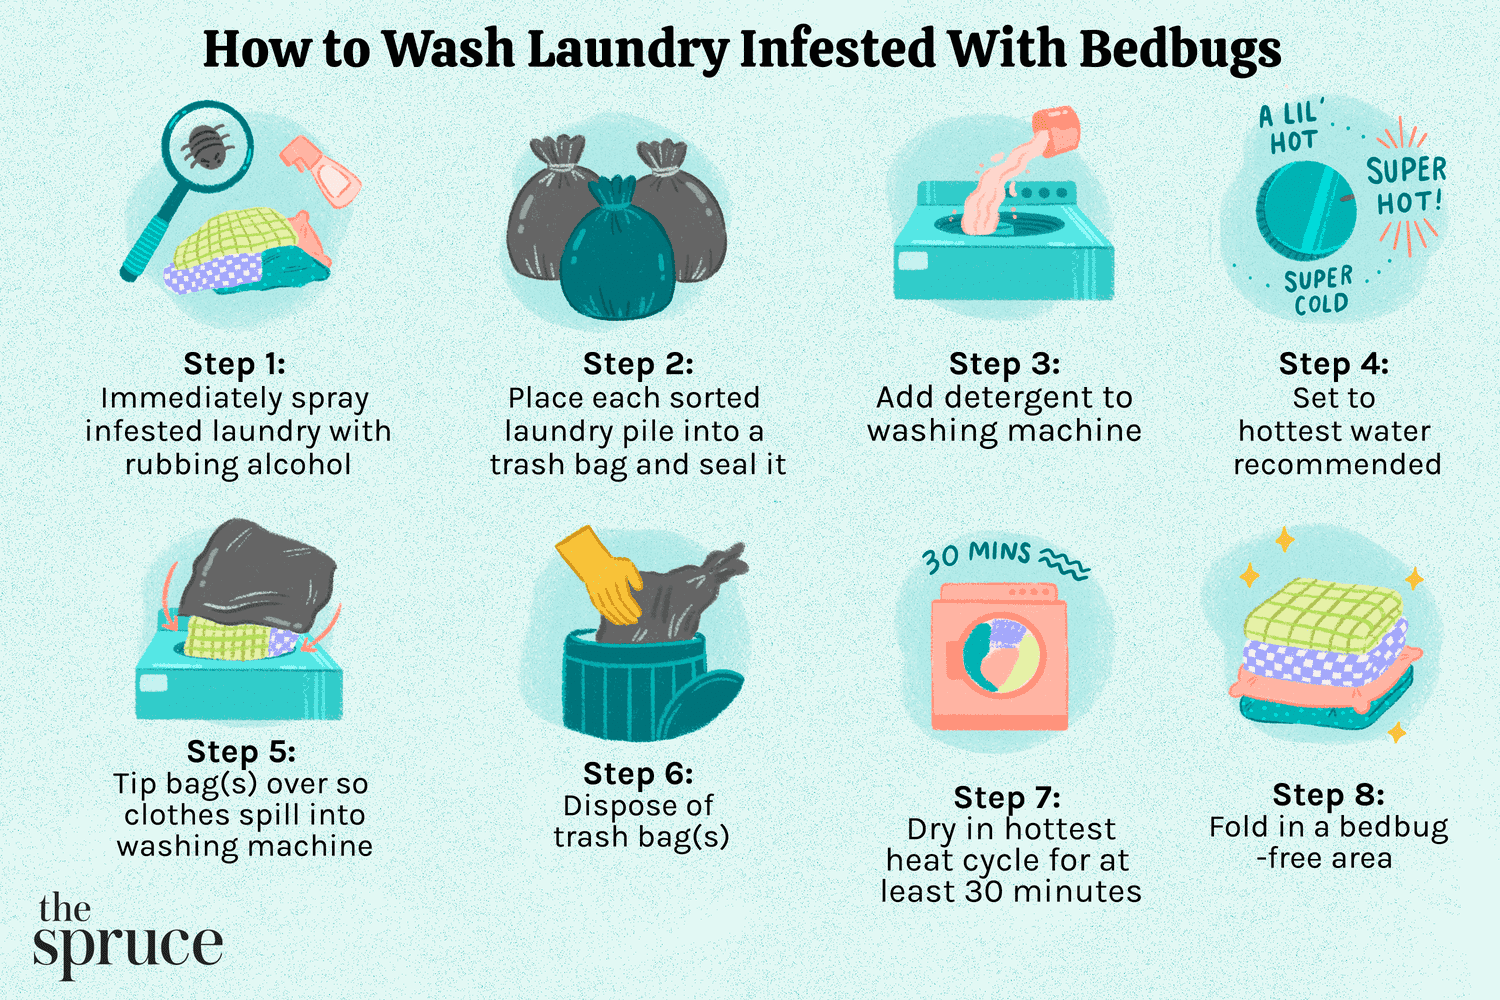
If you have recently had bed bugs in your home, it is important to clean your washing machine thoroughly to prevent any further infestations. Here is a step-by-step guide to cleaning your washing machine after bed bugs:
1. Remove any visible bugs or eggs from the machine using a vacuum cleaner or a damp cloth.
2. Run a hot water cycle with bleach or white vinegar to kill any remaining bugs or eggs.
3. Wipe down the inside of the machine with a damp cloth and allow it to air dry.
4. If possible, remove and clean the detergent dispenser and any other removable parts.
5. Repeat the cleaning process after a week to ensure all bed bugs and eggs have been eliminated.
By following these steps, you can effectively clean your washing machine after a bed bug infestation and prevent any further spread of the pests.
:max_bytes(150000):strip_icc()/Handle-bed-bug-infestation-laundry-2146304-V1-899a4efc4ca54972959fafa4c1263cf4.png)
How to Clean Washing Machine After Bed Bugs?
Bed bugs are one of the most common household pests that can infest your bedding, clothing, and other fabrics. If your washing machine has been exposed to bed bugs, it’s important to thoroughly clean it to prevent the spread of these pesky insects. In this article, we’ll discuss the steps you need to take to clean your washing machine after bed bugs.
Step 1: Gather Your Supplies
Before you begin cleaning your washing machine, you’ll need to gather some supplies. You’ll need a vacuum with a hose attachment, a scrub brush, a bucket, and some cleaning solution. You can use a commercial cleaning solution or make your own by mixing equal parts of water and white vinegar.
Once you have your supplies, unplug your washing machine and move it away from the wall. You’ll want to have plenty of space to work around the machine.
Step 2: Vacuum the Inside of Your Washing Machine
The first step in cleaning your washing machine is to vacuum the inside of the machine. Use the hose attachment on your vacuum to remove any bed bugs, eggs, or debris from the drum and other parts of the machine. Be sure to vacuum around the door seal and in the detergent dispenser as well.
Step 3: Scrub the Inside of Your Washing Machine
Once you’ve vacuumed the inside of your washing machine, it’s time to scrub it clean. Mix your cleaning solution in a bucket and use a scrub brush to clean the drum, agitator, and other parts of the machine. Be sure to pay special attention to any areas where bed bugs or eggs may be hiding.
Step 4: Clean the Exterior of Your Washing Machine
While you’re cleaning the inside of your washing machine, don’t forget to clean the exterior as well. Use a damp cloth and your cleaning solution to wipe down the outside of the machine, including the control panel and knobs.
Step 5: Run a Hot Water Cycle
After you’ve cleaned your washing machine, it’s important to run a hot water cycle to sanitize the machine. Use the hottest water setting available and add some white vinegar to the cycle. This will help to kill any remaining bed bugs or eggs that may be hiding in your machine.
Step 6: Clean Your Detergent Dispenser
Bed bugs can also hide in your detergent dispenser, so it’s important to clean this part of the machine as well. Remove the dispenser and soak it in your cleaning solution for a few minutes. Use a scrub brush to clean any remaining debris or bed bugs.
Step 7: Dry Your Washing Machine
Once you’ve finished cleaning your washing machine, it’s important to dry it thoroughly. Use a clean, dry cloth to wipe down the inside of the machine and leave the door open to allow air to circulate.
Step 8: Check Your Other Laundry Items
If your washing machine has been exposed to bed bugs, it’s important to check your other laundry items as well. Wash your bedding, clothing, and other fabrics in hot water and dry them on high heat to kill any remaining bed bugs or eggs.
Step 9: Prevent Future Bed Bug Infestations
To prevent future bed bug infestations, it’s important to take some preventative measures. Use bed bug-proof mattress and pillow covers, vacuum your home regularly, and inspect any used furniture or clothing before bringing it into your home.
Step 10: Consider Professional Bed Bug Treatment
If your home has a bed bug infestation, it may be necessary to call a professional exterminator. A professional can help to eliminate the bed bugs from your home and prevent future infestations.
In conclusion, cleaning your washing machine after bed bugs is an important step in preventing the spread of these pesky insects. By following these steps, you can ensure that your washing machine is clean and free of bed bugs. Remember to take preventative measures to avoid future infestations and consider calling a professional if you have a bed bug problem in your home.
Frequently Asked Questions
Bed bugs are a common household pest that can easily infest your clothes and bedding. If you’ve recently discovered bed bugs in your washing machine, it’s important to take immediate action to prevent a full-blown infestation. Here are some frequently asked questions about how to clean your washing machine after bed bugs.
How do I know if my washing machine has bed bugs?
The first sign of bed bugs in your washing machine is usually small black or brown spots on your clothes or bedding. These spots are actually bed bug feces and are a telltale sign of an infestation. You may also notice small red bites on your skin or a musty odor coming from your washing machine. If you suspect bed bugs in your washing machine, it’s important to take action immediately to prevent the infestation from spreading.
One way to confirm that your washing machine has bed bugs is to inspect the machine’s crevices and seams for live bugs or eggs. Bed bugs are about the size of an apple seed and are reddish-brown in color. If you see any bugs or eggs, it’s time to start the cleaning process.
How do I clean my washing machine after bed bugs?
Cleaning your washing machine after a bed bug infestation is a multi-step process. First, remove all clothes and bedding from the machine and place them in sealed plastic bags. This will prevent any remaining bed bugs from spreading to other areas of your home.
Next, vacuum the inside of the washing machine, paying special attention to the crevices and seams where bed bugs like to hide. Dispose of the vacuum bag immediately after use.
Can I use pesticides to clean my washing machine after bed bugs?
It’s not recommended to use pesticides to clean your washing machine after a bed bug infestation. Pesticides can be dangerous to your health and may not effectively kill all the bed bugs in your machine. Instead, use hot water and detergent to thoroughly clean the machine’s interior.
After cleaning, run an empty cycle on the hottest setting to ensure that any remaining bed bugs or eggs are killed. You may also want to consider using a bed bug spray or powder on your clothes and bedding before washing them to prevent a re-infestation.
How often should I clean my washing machine after a bed bug infestation?
It’s a good idea to clean your washing machine after every bed bug infestation to prevent the bugs from spreading to other areas of your home. If you’ve had a particularly severe infestation, you may want to clean the machine multiple times to ensure that all the bugs and eggs are gone.
You can also take steps to prevent bed bugs from getting into your washing machine in the first place, such as regularly inspecting your bedding and clothes for signs of infestation and using bed bug-proof mattress and pillow covers.
Can I prevent bed bugs from getting into my washing machine?
While it’s difficult to completely prevent bed bugs from infesting your washing machine, there are steps you can take to minimize the risk. Always inspect your clothes and bedding for signs of bed bugs before washing them, and consider using bed bug-proof covers on your mattress and pillows. You may also want to use a bed bug spray or powder on your clothes and bedding to kill any bugs or eggs before washing them.
If you do discover bed bugs in your washing machine, it’s important to take immediate action to prevent the infestation from spreading to other areas of your home. Thoroughly clean the machine and use hot water and detergent to kill any remaining bugs or eggs.
In conclusion, cleaning your washing machine after bed bugs infestation is crucial to prevent any further spread of the pesky little pests. By following the steps outlined above, you can ensure that your washing machine is thoroughly cleaned and disinfected, leaving it free from any bed bugs or their eggs.
Remember, it’s important to take preventative measures such as vacuuming and washing bedding regularly to avoid another bed bug infestation. By keeping your home clean and tidy, you can rest easy knowing that you’re doing your part to keep bed bugs at bay.
In the end, proper cleaning is the key to preventing bed bugs from wreaking havoc in your home. With a little extra effort and diligence, you can ensure that your washing machine is free from bed bugs and their eggs, giving you peace of mind and a cleaner, healthier living environment.