Do you have a car air filter that’s in need of a deep clean? If so, you’re in the right place. In this article, we’ll be taking a look at how to clean an Aem air filter and get it back to its former glory. We’ll be discussing the materials you’ll need, the step-by-step process of cleaning it, and the importance of proper maintenance. So if you’re looking for a comprehensive guide to restoring your Aem air filter, you’ve come to the right place.
How to Clean a Aem Air Filter?
- Step 1: Remove the filter from the air box.
- Step 2: Shake the filter to remove any loose dirt and debris.
- Step 3: Place the filter in a bucket of warm soapy water.
- Step 4: Let the filter soak for 10 minutes.
- Step 5: Use a soft brush to scrub the filter and remove any remaining dirt.
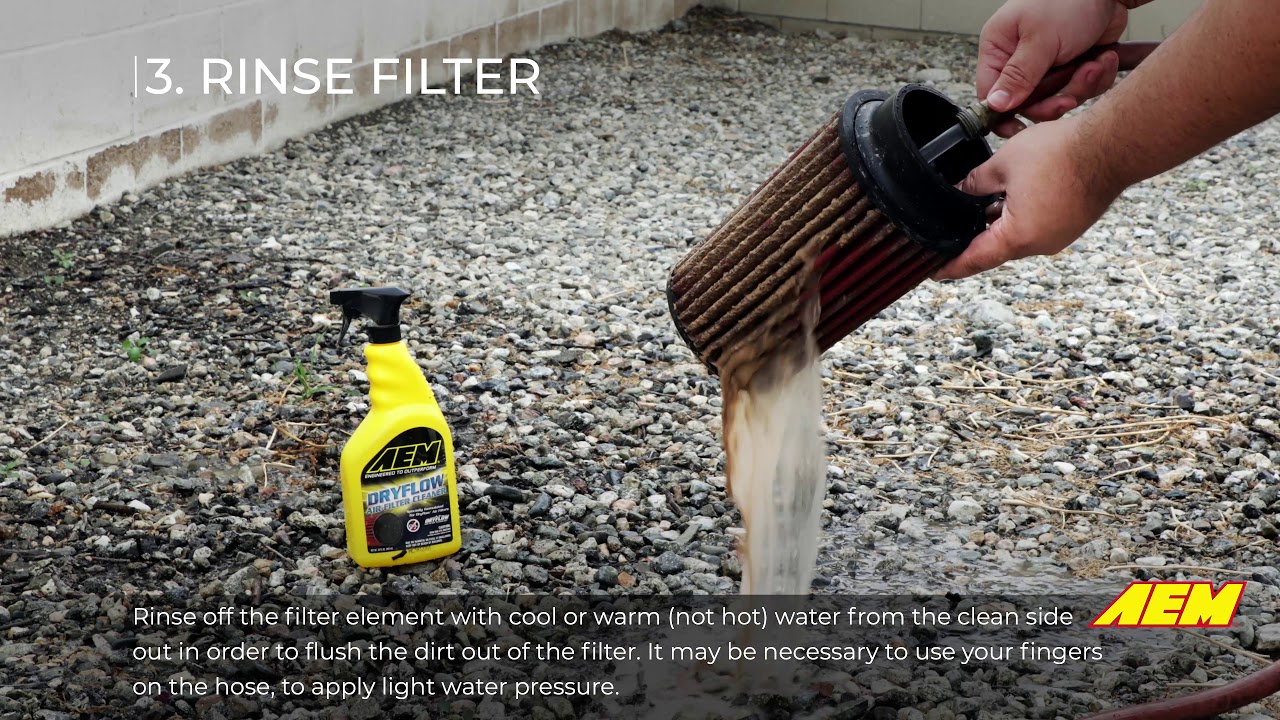
- Step 6: Rinse the filter in warm water.
- Step 7: Allow the filter to air dry before reinstalling.
to explain the information in a detailed manner.
How to Clean a K&N Air Filter
Cleaning a K&N air filter is an important process that should be done regularly in order to keep your engine running efficiently. K&N air filters are designed to trap dirt and other airborne particles from entering the engine, which can cause improved performance and fuel efficiency. Here are some tips on how to clean a K&N air filter to get the most out of your engine.
Step 1: Preparing the Air Filter
The first step in cleaning your air filter is to remove it from your vehicle. Once the air filter is removed, check for any large chunks of dirt or debris that can be removed with a brush. If there are any large chunks, remove them using a soft brush. Be sure to not damage the filter in the process.
Next, use a vacuum cleaner to suck out any remaining dirt and debris. Be sure to use the proper attachments and be careful not to damage the filter. If there are any small pieces of debris, use a soft brush to carefully remove them.
Step 2: Cleaning the Air Filter
Once all of the debris has been removed, it is time to clean the air filter. The best way to clean a K&N air filter is to use the K&N air filter cleaning kit. This kit comes with a special cleaning solution and a brush for scrubbing the filter. Begin by pouring the cleaning solution into a bucket and then submerging the air filter into the solution. Allow the filter to soak for 10-15 minutes.
After the filter has been soaking, use the brush provided in the cleaning kit to scrub the filter. Be sure to scrub both sides of the filter and pay close attention to any corners or crevices. Once you have scrubbed the filter, rinse it off with warm water to remove any remaining dirt and debris.
Step 3: Drying the Air Filter
Once the filter has been thoroughly cleaned and rinsed, it is time to let it dry. The best way to dry a K&N air filter is to let it air dry in the sun for at least 12 hours. Once the filter is dry, it is ready to be re-installed in your vehicle.
Step 4: Re-installing the Air Filter
Once the filter is dry, it is time to re-install it in your vehicle. Be sure to follow the instructions provided in your vehicle’s manual for how to properly install the filter. Once the filter is installed, start the engine and check for any air leaks around the filter.
Step 5: Maintenance
Once your K&N air filter is installed and running properly, it is important to regularly maintain it. The best way to maintain your air filter is to check it every 3,000 miles or so and clean it when necessary. If you do not maintain your air filter, it may become clogged and cause poor engine performance.
Using the K&N Recharger Kit
In addition to regular cleaning, K&N also recommends using the K&N Recharger Kit to help maximize the performance of your air filter. The Recharger Kit comes with a special oil that helps to restore the filter’s efficiency and helps to trap more dirt and debris. The Recharger Kit should be used every 50,000 miles or so.
Tips for Cleaning Your K&N Air Filter
- Be sure to use the cleaning solution and brush provided in the K&N air filter cleaning kit.
- Allow the filter to dry in the sun for at least 12 hours before re-installing it.
- Check and clean your air filter every 3,000 miles or so.
- Use the K&N Recharger Kit every 50,000 miles to help restore the filter’s efficiency.
Conclusion
Cleaning a K&N air filter is an important part of maintaining your engine and ensuring that it runs efficiently. Be sure to follow the steps outlined above for how to properly clean your air filter and use the K&N Recharger Kit every 50,000 miles to help restore the filter’s efficiency. With proper cleaning and maintenance, your air filter will last for many years.
Frequently Asked Questions
What is an AEM Air Filter?
An AEM Air Filter is a type of air filter used in many vehicles to help protect the engine from dirt and other foreign particles. It is designed to allow a maximum amount of air to flow through it while still filtering out dirt and other contaminants. It is usually made of a foam material, which is designed to trap particles as small as two microns in size.
The AEM Air Filter is designed to be used as part of the vehicle’s air intake system, where it is placed between the air intake and the engine, helping to filter out contaminants that could otherwise damage the engine.
How Often Should I Clean My AEM Air Filter?
It is recommended that the AEM Air Filter be cleaned every 10,000 to 15,000 miles or every 12 months. This will ensure that the filter is able to continue to filter out dirt and other contaminants and help keep the engine running as efficiently as possible.
It is also important to inspect the AEM Air Filter regularly, even if it has not yet reached the recommended 10,000 to 15,000 mile or 12 month interval. This will help you to identify any potential issues before they become a problem, allowing you to take action before any damage is done to the engine.
What Materials Do I Need to Clean My AEM Air Filter?
In order to clean your AEM Air Filter, you will need a few basic materials. These include a bucket or container, some warm water, a brush, a cleaning solution (dish soap is sufficient), and a compressor or air blower.
Once you have gathered the necessary materials, you can begin the process of cleaning your AEM Air Filter. Start by soaking the filter in the bucket or container filled with warm water and a small amount of the cleaning solution. This will help to loosen any dirt and debris that is stuck to the filter. Then, use the brush to scrub the filter thoroughly, making sure to get into all of the nooks and crannies.
How Do I Dry My AEM Air Filter After Cleaning?
Once you have finished cleaning your AEM Air Filter, you need to dry it before you can reinstall it in the vehicle. The best way to do this is by using a compressor or air blower to blow the excess water out of the filter. Make sure to aim the air blower away from the filter to avoid damaging it.
Once the filter is dry, you can reinstall it in the vehicle and continue to enjoy the benefits of having a clean air filter. It is important to remember to check and clean your filter regularly to ensure that it is always in good condition and providing maximum protection for your engine.
What Are the Benefits of Cleaning My AEM Air Filter?
The main benefit of cleaning your AEM Air Filter is to ensure that it is able to continue to filter out dirt and other contaminants and allow for maximum airflow. This will help to keep your engine running as efficiently as possible and reduce the risk of damage from dirt and other contaminants.
Additionally, a clean AEM Air Filter will help to improve the overall performance of your vehicle by allowing it to draw in more air, which can improve fuel economy and reduce emissions. This, in turn, can help to save you money on fuel and reduce your overall environmental impact.
Official AEM Dryflow® Air Filter Cleaning Instructions
Cleaning your air filter regularly is important for maintaining the quality and longevity of your air conditioner. By following the steps outlined in this article, you can easily and effectively clean your air filter to ensure your air conditioner is running efficiently and effectively. With regular maintenance and cleaning, your air filter will last longer and provide you with the clean air and quality comfort you need.
