Are you looking to keep your boat running smoothly and efficiently? Cleaning a boat carburetor is a great way to ensure your boat is performing at its best. Learning how to clean a boat carburetor may seem intimidating, but it doesn’t have to be. With the correct tools and techniques, boat owners can easily maintain their boat’s engine and keep their vessel running like new. In this article, we will provide step-by-step instructions on how to clean a boat carburetor.
- Disconnect the carburetor from the engine and remove it from the boat.
- Open the carburetor and separate the parts.
- Clean the parts with a carburetor cleaner and a brush.
- Reassemble the carburetor and put it back on the engine.
- Reconnect the carburetor and test it.
How to Clean a Boat Carburetor
Having a clean carburetor on your boat engine is essential for its smooth operation. A dirty carburetor can lead to reduced performance, poor fuel economy, and possible engine failure. Cleaning a carburetor is a straightforward process, but it can be a bit time consuming. With the right tools and a bit of patience, you can get your carburetor back into peak condition.
Gather the Necessary Tools and Supplies
Before you begin cleaning your carburetor, make sure you have all the necessary tools and supplies. You’ll need a carburetor cleaner, a pair of pliers, a few rags, and a flat-head screwdriver. If you’re replacing the gaskets, be sure to have a new set of gaskets on hand.
Remove the Carburetor From the Engine
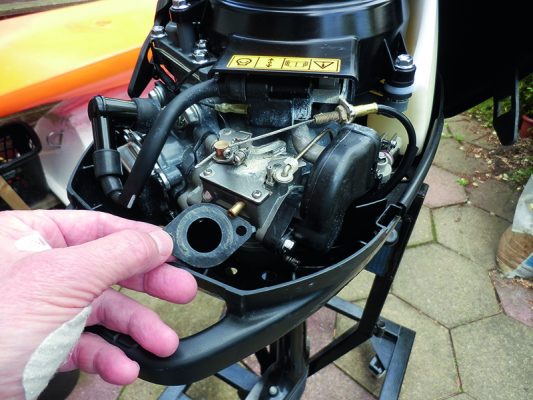
The first step in cleaning your boat’s carburetor is to remove it from the engine. Make sure the engine is off and the spark plugs are removed. Then use a pair of pliers to detach the carburetor from the engine. Be sure to label all the parts as you remove them so you know how to put them back together.
Disassemble the Carburetor
Once the carburetor is removed from the engine, you can begin the disassembly process. Start by removing the air filter and air cleaner housing. Then remove the carburetor body and the carburetor bowl. Next, remove the choke plate and the float. Finally, remove the jets and the gaskets.
Clean the Parts
Once you have the carburetor disassembled, it’s time to clean all the parts. Start by using a rag to wipe down all the parts. Next, use a carburetor cleaner to clean the jets and the carburetor bowl. When you’re done, be sure to rinse off all the parts with water.
Inspect the Parts
Once the parts are clean, it’s time to inspect them for any damage or wear. Look for cracks, leaks, and other signs of damage. If any of the parts are damaged, replace them with new ones.
Reassemble the Carburetor
Once the parts have been inspected and any damaged parts have been replaced, it’s time to reassemble the carburetor. Start by replacing the gaskets and the jets. Then reattach the float, choke plate, and carburetor bowl. Finally, reattach the air filter and the air cleaner housing.
Reattach the Carburetor to the Engine
Once the carburetor is reassembled, it’s time to reattach it to the engine. Make sure the spark plugs are in place and the engine is off. Then use a pair of pliers to reattach the carburetor to the engine.
Test the Carburetor
Before you start the engine, it’s important to test the carburetor. Start by turning on the fuel valve and then turn on the ignition. If the carburetor is working properly, the engine should start right up. If it doesn’t, you may need to adjust the carburetor or replace some parts.
Adjust the Carburetor
If the engine isn’t running smoothly, you may need to adjust the carburetor. Start by checking the idle speed and then adjust the idle mixture screw. If the engine is still running rough, you may need to adjust the main jet or the accelerator pump.
Maintain the Carburetor
Once you have the engine running smoothly, it’s important to keep up with regular maintenance. Make sure the air filter is clean and the fuel lines are free of blockages. Also, check the carburetor for any signs of wear or damage.
Troubleshooting Common Problems
If your engine isn’t running properly, there are a few common problems you should look for. If the engine is running rough, it could be caused by a clogged air filter or a dirty carburetor. If the engine won’t start, it could be caused by a faulty spark plug or a bad fuel pump.
Related Faq
What is a Boat Carburetor?
A boat carburetor is a part of the fuel system that mixes air with fuel for combustion in a boat engine. It helps regulate the air-fuel ratio for optimal engine performance and fuel efficiency. The carburetor is usually located in the engine compartment and is connected to the fuel line and the ignition system.
How to Clean a Boat Carburetor?
To clean a boat carburetor, you must first disconnect the fuel line and remove the carburetor from the engine. Then, you’ll need to disassemble the carburetor and remove the float, jets, and other components. Once the parts are removed, you can use carburetor cleaner to clean the parts and then reassemble the carburetor. Finally, you can reinstall the carburetor and reconnect the fuel line.
What Tools Are Needed to Clean a Boat Carburetor?
To clean a boat carburetor, you’ll need a few basic tools. You’ll need a socket set, a screwdriver, carburetor cleaner, and a pair of pliers. You may also need a gasket set and other specialized tools depending on the type of boat and carburetor.
Are There Any Safety Precautions to Take When Cleaning a Boat Carburetor?
Yes, there are several safety precautions to take when cleaning a boat carburetor. Always wear safety glasses and gloves to protect your eyes and hands from fuel and other chemicals. Also, make sure to disconnect the battery terminals and remove the spark plugs before disassembling the carburetor.
Are There Any Tips to Keep in Mind When Cleaning a Boat Carburetor?
Yes, there are several tips to keep in mind when cleaning a boat carburetor. Always be sure to inspect the carburetor for any damage before cleaning. Also, make sure to use the right type of carburetor cleaner and follow the instructions on the label. Finally, be sure to reinstall the carburetor correctly and reconnect all the fuel lines.
How To Quickly/Easily Clean a Carburetor on a Outboard Boat Motor (9.9HP Johnson)
Overall, cleaning a boat carburetor is a fairly straightforward process that can be done in a day. With the right tools, some patience and a few steps, you can get your boat running smoothly and efficiently. Just remember to always wear the proper safety equipment, such as safety glasses and gloves, and to always follow the manufacturer’s instructions for your particular model.
